
I've been camping in Western Washington for over 30 years. I've set up tents in October rain on the Olympic Peninsula, in sideways sleet near Mt. Rainier, and in the kind of steady drizzle that the Cascades serve up nine months a year. And I'll tell you plainly: getting soaked is almost always avoidable. It's not gear budget that separates a dry night from a miserable one. It's knowing the right sequence of decisions, from the moment you pick your campsite to the moment you zip your sleeping bag.
Most people who end up wet in camp made one of five specific mistakes. I've made all of them. This guide covers each one as a step you can fix before your next trip. The shelter step centers on the Forceatt tent, which I've used on 30-plus wet nights over the past 14 months and consider the right call for most budget-conscious backpackers heading into the PNW.
Your shelter is the foundation of every other step. If it leaks, nothing else in this guide matters.
The Forceatt 2-3 Person backpacking tent has held up through 14 months of wet Washington weather for me. 4.6 stars from over 1,800 verified buyers. If you don't have a reliable tent yet, start here.
Amazon Check Today's Price on Amazon →Step 1: Pick the Right Site Before You Do Anything Else
Site selection is the most underrated skill in wet-weather camping. The best tent in the world will feel inadequate if you pitch it in a depression that becomes a puddle by midnight. When I arrive at a site, I spend five full minutes walking it before I pull out any gear.
Look for three things. First, a slight crown or slope (not more than 3 to 5 degrees) so water drains away from the tent footprint rather than pooling beneath it. Second, natural overhead cover. A dense canopy of Douglas fir or cedar intercepts a surprising amount of rain. You will still get wet, but the rate drops noticeably. Third, avoid the low-lying areas near creeks or gullies. In the Olympics and the southern Cascades, I've watched those spots go from dry to six inches of standing water in under two hours during a hard rain. Set up on a bench or slight rise and you sidestep the problem entirely.
One more thing: look at the ground. Soft, spongy soil absorbs water well early in a storm but saturates fast. Rocky or compacted ground runs water off the surface quickly. When I can choose, I prefer firm, slightly gravelly ground under my tent, with a clear path for runoff to travel away from my door.
Step 2: Set Up Your Shelter Correctly, Not Just Quickly
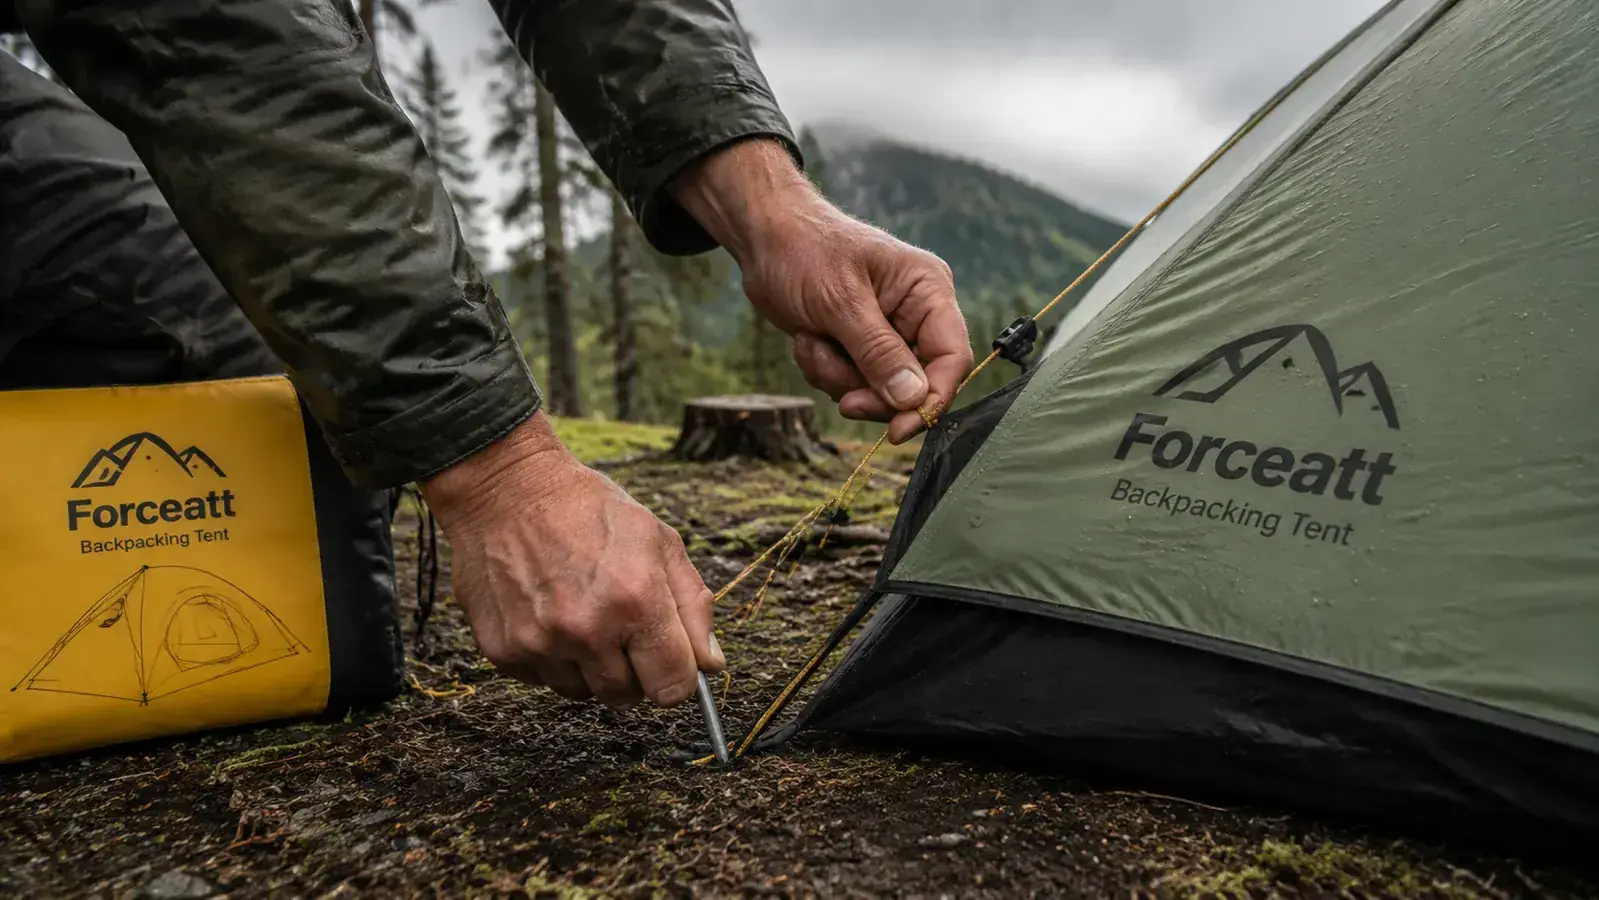
Most people pitch a tent in five minutes when it's dry and fight with it for twenty minutes in the rain. The fix is to practice your setup at home at least twice before a wet trip, so the sequence is automatic. With the Forceatt, I can have it fully staked and guyed out in under eight minutes now. That matters when rain is actively falling.
The single most important thing you can do when pitching in rain is get the rainfly on first. The Forceatt design lets you deploy the fly before the inner tent is fully tensioned, which I confirmed works on a trip near Lake Wenatchee last October when a squall came through while I was still staking corners. The inner tent stayed mostly dry because the fly was already overhead.
Tension matters more in rain than in dry conditions. A loose rainfly sags and makes contact with the inner tent wall. When the fly touches the inner, moisture transfers through. Tighten every stake point firmly. Then run the included guy lines if wind is present. The Forceatt has anchor points at all four corners and at the fly peak. In a sustained Cascades wind-and-rain combination, every one of those points should be staked. I've had the tent survive 35 mph gusts on a ridge near Rainier with all anchor points fully set, no collapse, no pooling on the fly.
One detail that took me longer than it should have to figure out: stake the guylines at a 45-degree angle away from the tent, not straight out from the pole. That geometry keeps the fly taut without pulling it off-center. Makes a real difference in how the fly sheds water at the seams.

Step 3: Use Your Vestibule as a Dry Zone, Not an Afterthought
A vestibule only works if you use it as a transition space. The moment you treat it like a porch you can track mud through, you will bring moisture into your sleeping area. I have a strict vestibule protocol on every wet trip.
Boots come off in the vestibule, every time. They go into a small dry bag or trash bag so they are not sitting in a puddle of their own drainage overnight. Rain jacket comes off in the vestibule and hangs from the guy line or gets tucked against the side of the fly, not brought into the inner tent. Pack cover stays on the pack while it sits in the vestibule. My wet outer layers never cross the door zipper of the inner tent.
The Forceatt vestibule is not huge. It measures roughly 18 by 24 inches on the single-door side. That is enough for two pairs of boots and a day pack, but not much more. If you are a two-person team with full 65-liter packs, you will need to make choices about what goes in the vestibule versus what stays covered by the fly outside the footprint. I keep my cooking kit and stove under the fly overhang on the side opposite the door, weighted with a rock so it does not blow. That frees up vestibule space for the boots-and-jacket protocol.
Step 4: Manage Your Insulation Layers to Avoid Moisture Buildup
Here is where most people lose the war even after winning the shelter battle. You can have a perfectly dry tent interior and still end up cold and damp at 3 a.m. because you wore your base layers all day in the rain, compressed them into your sleeping bag at night, and let your body heat drive that moisture outward into your insulation.
The rule I follow is simple: I bring a dedicated set of dry sleeping clothes that never leave the tent. They go in a dry bag inside my pack before the trip starts, and they come out only once I am inside the tent with my wet outer layers already off and in the vestibule. My sleeping base layer is typically a midweight merino wool long-sleeve top and bottoms. Wool is worth the weight here because it retains some insulating value even if it does pick up a little ambient moisture from condensation. Synthetic wicks faster but smells worse after two nights, which matters on a three-day trip.
If you are camping in temperatures below 40 degrees Fahrenheit, which happens at elevation in the Cascades from October through May, add a puffy layer as your sleep insulator. Put it on inside the tent, over your dry base layer, before the outside air drops. Do not wait until you are already cold. Rewarming a cold body inside a sleeping bag burns more energy and takes longer than simply staying warm from the start.
You can have a perfectly dry tent and still be cold and damp by 3 a.m. if your base layer came in wet. Keep one set of sleep clothes that never touches the rain.
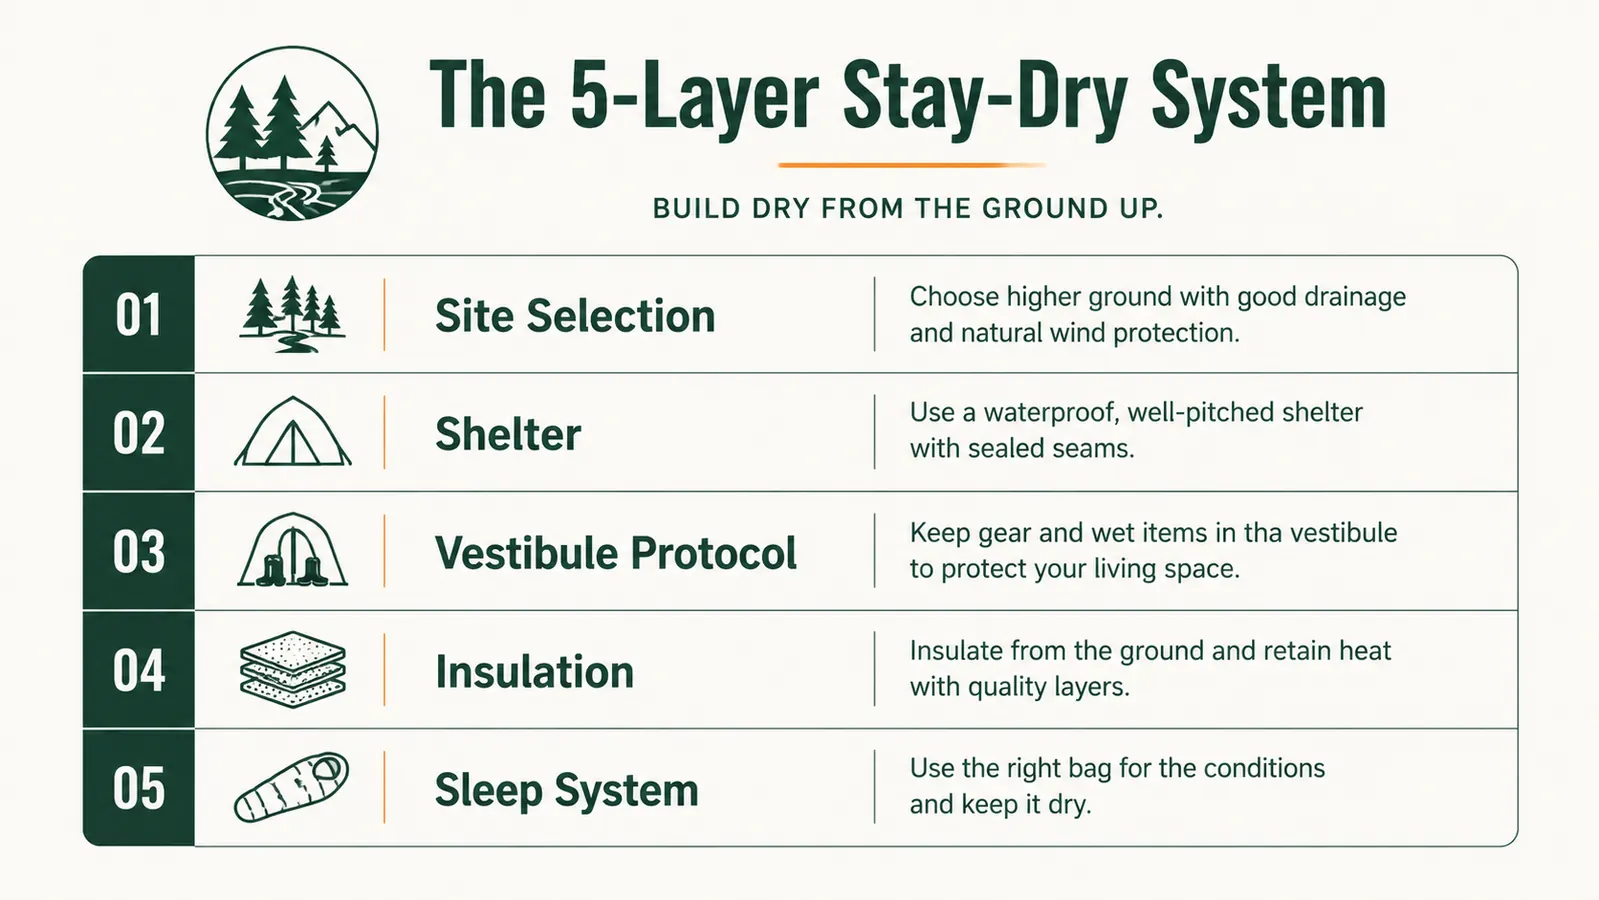
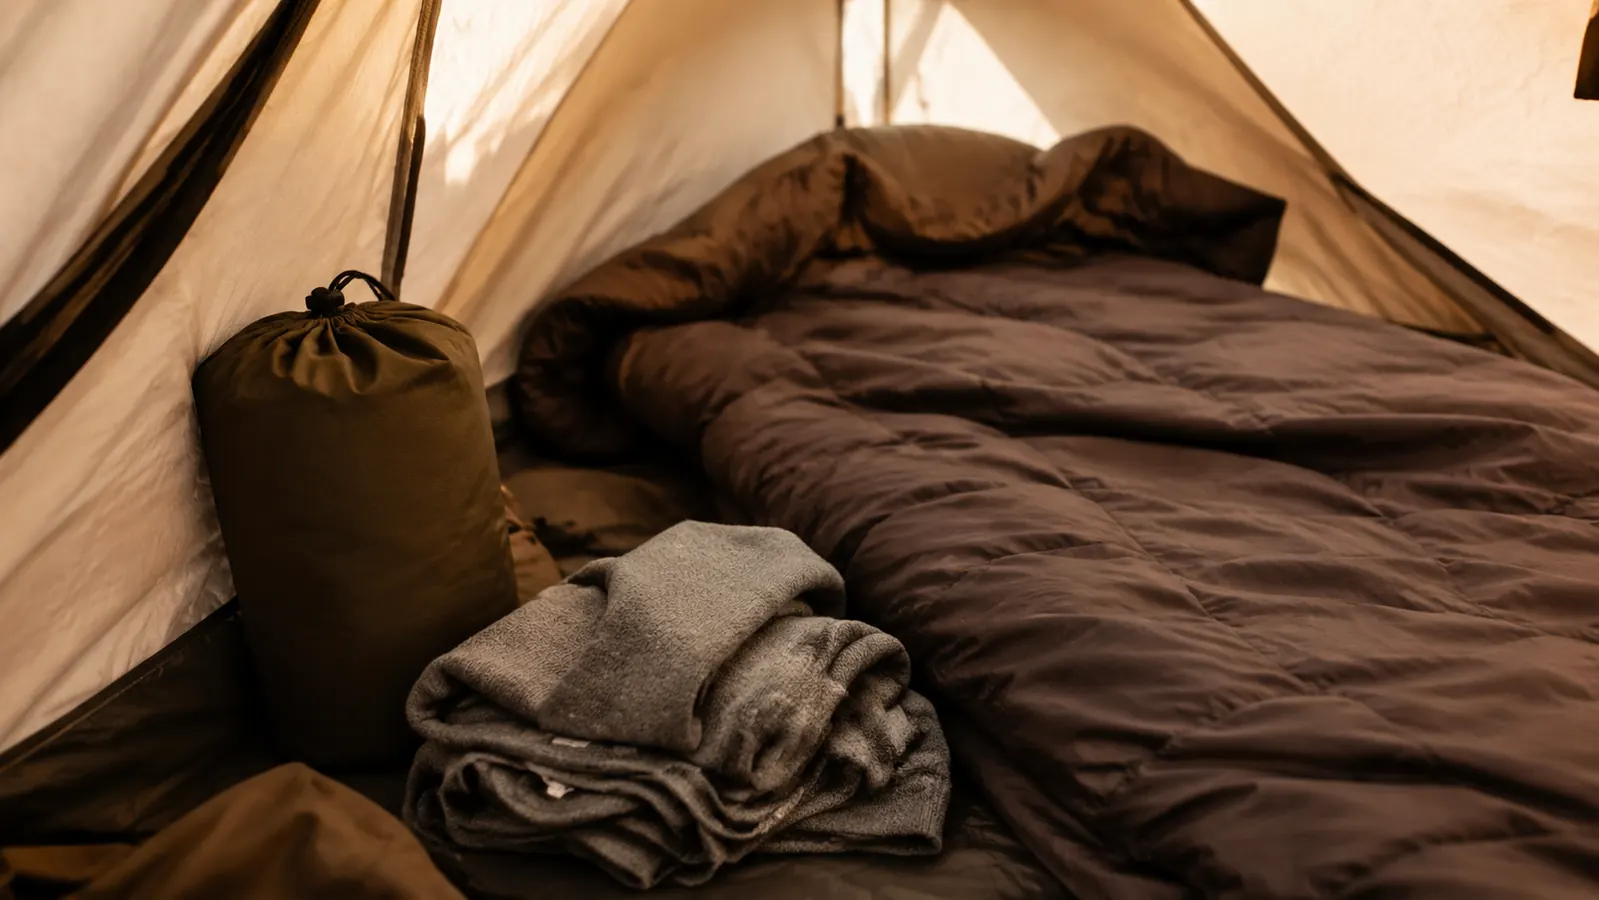
Step 5: Protect Your Sleep System from Ground Moisture and Condensation
The ground is the sneakiest source of moisture in a wet camp. Even with a quality tent floor, ground moisture migrates upward through light fabrics under sustained rain. A sleeping pad is your primary defense. Minimum R-value 2.5 for summer PNW camping. R-value 4 or above if you are camping above 3,000 feet in October or any shoulder season trip. The pad creates a thermal and moisture break between you and the ground. Without it, your sleeping bag bottom will absorb ground cold and any condensation that seeps through.
Condensation on the inner tent wall is normal and unavoidable in cold, wet conditions. It forms because you are breathing and radiating warmth inside a closed nylon shell. The strategy is not to eliminate it but to keep it away from your bag. Leave six inches of clearance between your sleeping bag and the tent wall. Never press your bag against the side of the inner tent. In the Forceatt, which has a mesh inner wall section on the upper third, I have found condensation drips are less common than in all-nylon inner tents because the mesh allows some vapor to pass through to the fly layer. That said, the gap rule still applies.
Store your sleeping bag in a compression sack during the day, inside a dry bag or a trash compactor bag. If your sleeping bag gets wet, it loses most of its insulating value. Down goes to near zero. Synthetics hold maybe 50 to 60 percent. Getting the bag soaked is the one failure mode that cannot be easily managed in the field. Protect it like you would your water filter or your fire-starting kit.
What Else Helps
A few additional items that have earned permanent space in my wet-weather kit: a small pack towel (Microfiber, 16 by 28 inches) that lives in the vestibule and handles boot drying and drip-off duty before I enter the inner tent. A handful of dry bags in 2L, 5L, and 10L sizes to keep clothes, electronics, and food separated from any moisture that gets into my pack. And a tarp, pitched as a rain kitchen about 15 feet from the tent door, sized at 8 by 10 feet minimum. Eating and cooking under the tarp keeps me from having to crack the tent door in steady rain, which is the fastest way to let moisture into the interior.
Seam sealing is worth checking on any tent before a serious wet trip. The Forceatt comes factory seam-taped, and in my experience those seams have held across 14 months without reapplication. But if you are camping in sustained rain above 3,000 feet in October, run a seam sealer along the floor seams and pole-entry points before the season starts. Ten minutes of prep avoids a very specific kind of misery at 2 a.m.
A tent that leaks on night one puts every other step in this guide underwater.
I've relied on the Forceatt 2-3 Person tent through Cascades rain, Olympic Peninsula drizzle, and one genuinely hostile October windstorm near Lake Wenatchee. 4.6 stars, over 1,800 verified buyers, and a price that does not require a second mortgage. If your current tent is keeping you up at night when the rain starts, this is the one I'd recommend replacing it with.
Amazon Check Today's Price on Amazon →