I have been filtering water in the Washington backcountry for going on 22 years. I've pulled from glacial melt above 7,000 feet in the North Cascades, from slow beaver ponds on the Olympic Peninsula, and from tannic cedar-stained creeks in the Hoh River valley. The sources all look different. The process I follow is mostly the same every time, and it's kept me healthy on every trip. What I want to share here is not a list of options or a gear roundup. It's the actual step-by-step process I use in the field, with the reasoning behind each step.
The short version: I use the Sawyer Squeeze, I select sources carefully, I pre-settle turbid water, I squeeze into a dedicated clean container, and I backflush on a set schedule. The details below matter. Skip source selection and your filter clogs fast. Skip backflushing and your flow rate drops to a frustrating trickle by day three. Follow the full process and the Sawyer Squeeze will reliably push a liter through in about 60 to 90 seconds for hundreds of liters before it ever needs more than a field maintenance backflush.
Your pack doesn't have room for a water source gamble. The Sawyer Squeeze weighs 3 oz and filters 100,000 gallons.
If you're not already carrying the Sawyer Squeeze, this is the one I recommend. It's what I've used on every trip in the Cascades for three years. Extremely simple field maintenance, no batteries, no moving parts that can freeze, and a lifetime warranty.
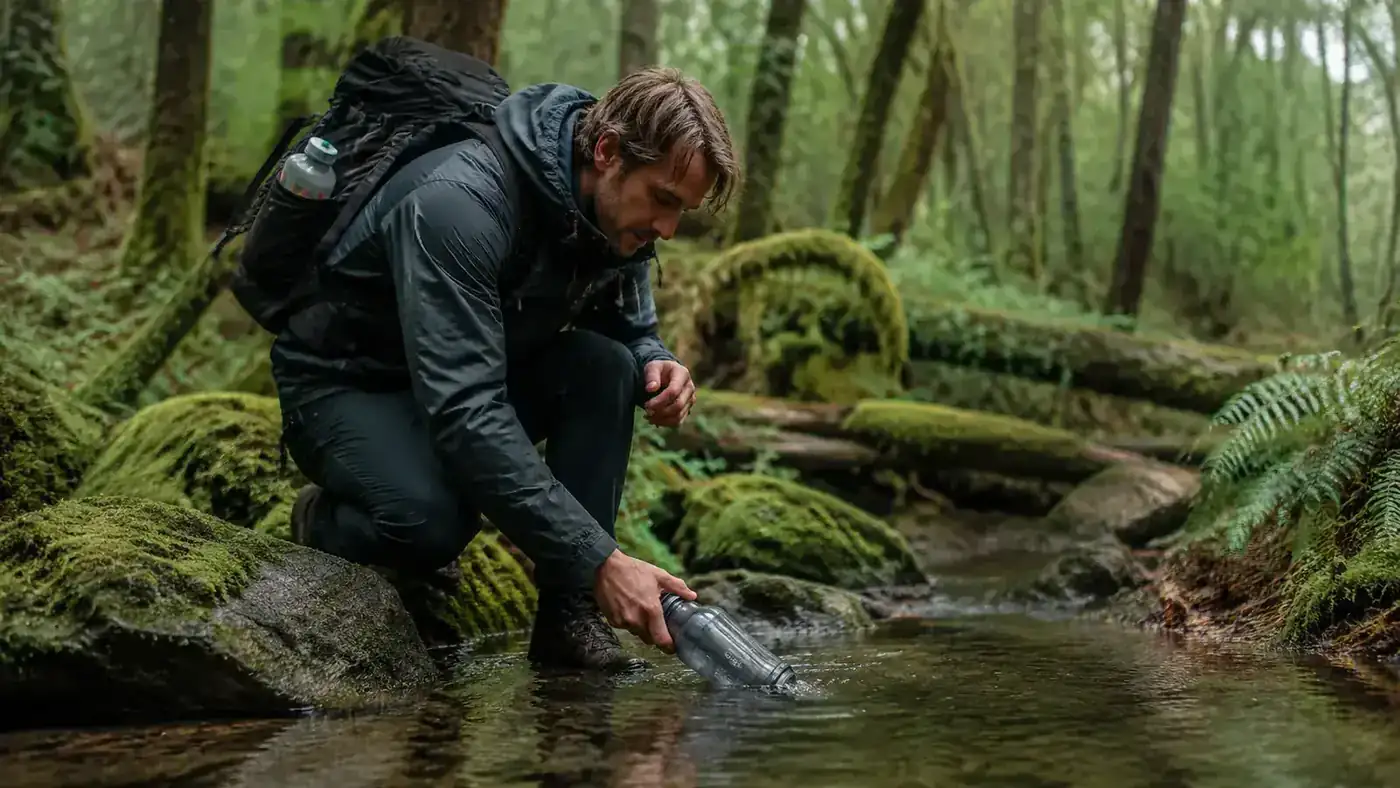
Amazon Check Today's Price on Amazon →Step 1: Choose Your Source With Intention
Most people walk up to the nearest water and start filling. That's the wrong approach. Not because every source is dangerous, but because source quality directly determines how fast your filter clogs, how clear your water tastes, and how long your filter lasts between backflushes. Spend 90 seconds evaluating before you fill and you'll save time and frustration downstream.
Moving water is almost always better than still water. Faster-moving water has more dissolved oxygen, less algae, and less standing sediment. Look for a section of stream where the flow is steady and the bottom is visible. Avoid the inside bends of rivers where sediment collects. Avoid anywhere you can see livestock tracks, a campsite, a trail crossing, or a developed outfitter camp upstream. In the Cascades I default to high-flow streams fed by snowmelt or glacier runoff when I can find them. The water is cold, clear, and fast. It puts the least load on my filter.
If the only available source is a slow pond or a murky creek, look for where a small feeder stream enters from uphill. Fill there. You're getting water before it has time to pool and go stagnant. In late summer on the east Cascades slopes, I've found ponds that look fine on the surface but have a sulfur-ish smell at the intake. I don't filter those. Chemical contamination and heavy metals pass straight through a hollow-fiber filter. If the source smells wrong, move on or boil and chemically treat instead of relying on mechanical filtration alone.
Step 2: Pre-Settle Glacial or Turbid Water
This step is the one most backpackers skip, and it's the one that kills filter longevity fastest. Glacial streams and late-summer creeks in the Olympics carry fine silt that hollow-fiber filters were not designed to process in volume. The particles are small enough to penetrate the pores and physically foul the membrane, reducing flow rate permanently over time. No amount of backflushing reverses that kind of clogging.
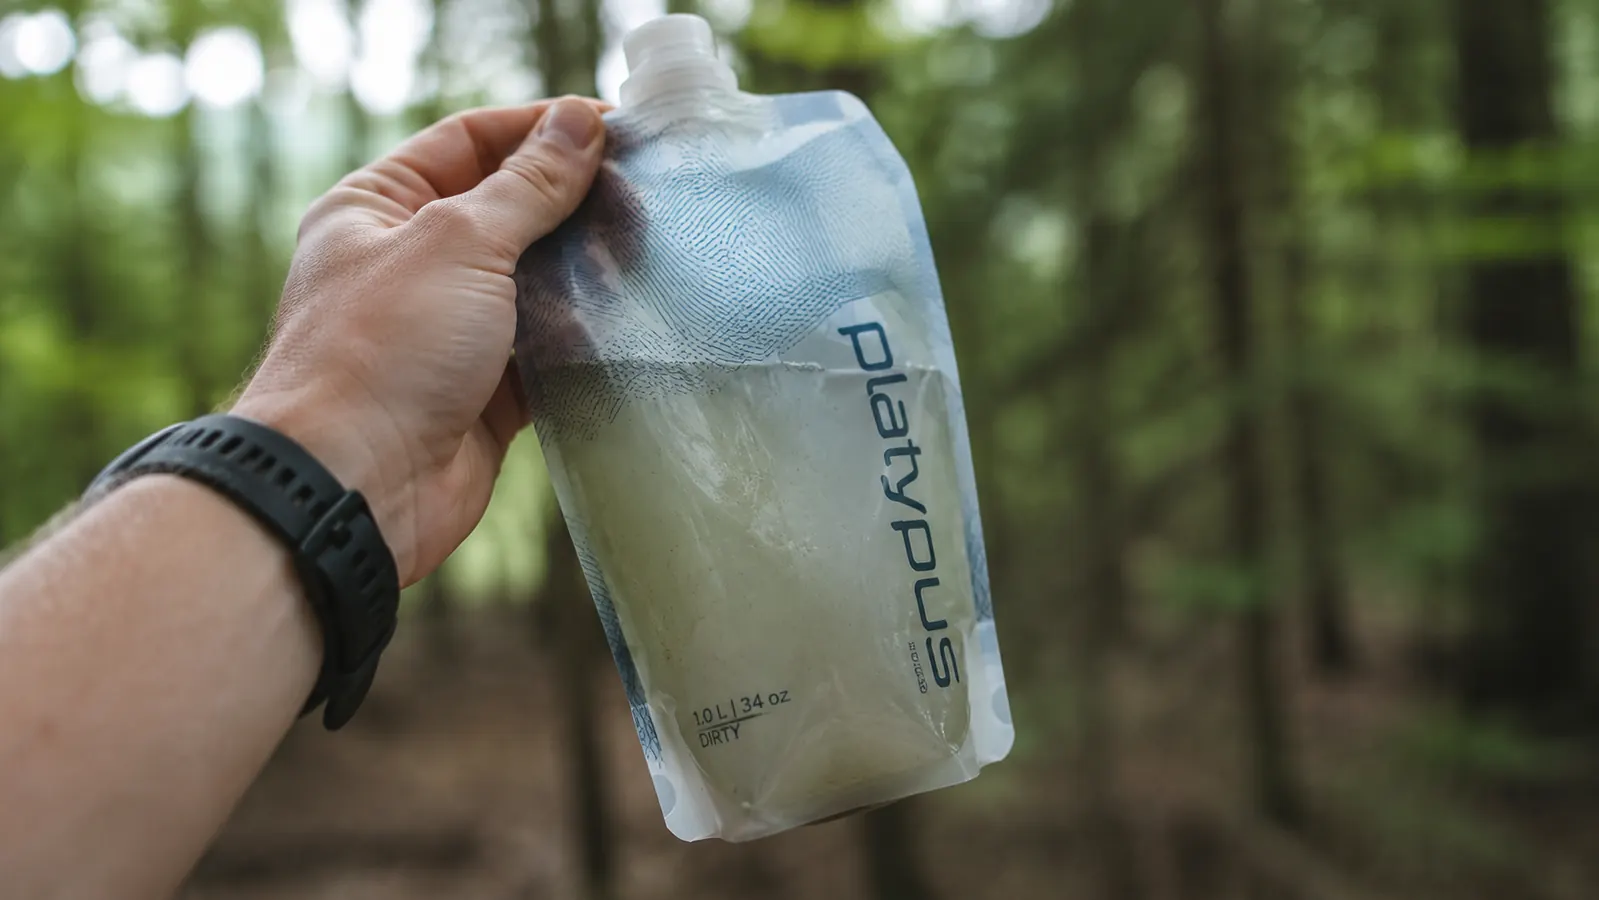
When I pull from turbid or silty water, I fill my dirty flask and set it upright in a shaded spot for 20 to 30 minutes before I filter. Most of the heavy particles settle to the bottom. I then tilt the flask slowly and fill the Sawyer Squeeze pouch from the middle of the column, leaving the sediment-heavy bottom inch behind. It's not a perfect process. But it measurably reduces the sediment load going through the filter, and over hundreds of liters that matters. If I'm in a hurry and the source is visibly turbid, I use a small coffee filter or a piece of clean synthetic camp bandana draped over the flask opening as a coarse pre-filter. The Sawyer will still do the pathogen removal. I'm just giving it cleaner input water to work with.
If the water is genuinely clear, skip this step. Moving mountain streams with a visible clean rocky bottom usually don't need pre-settling. Fill the pouch directly and squeeze.
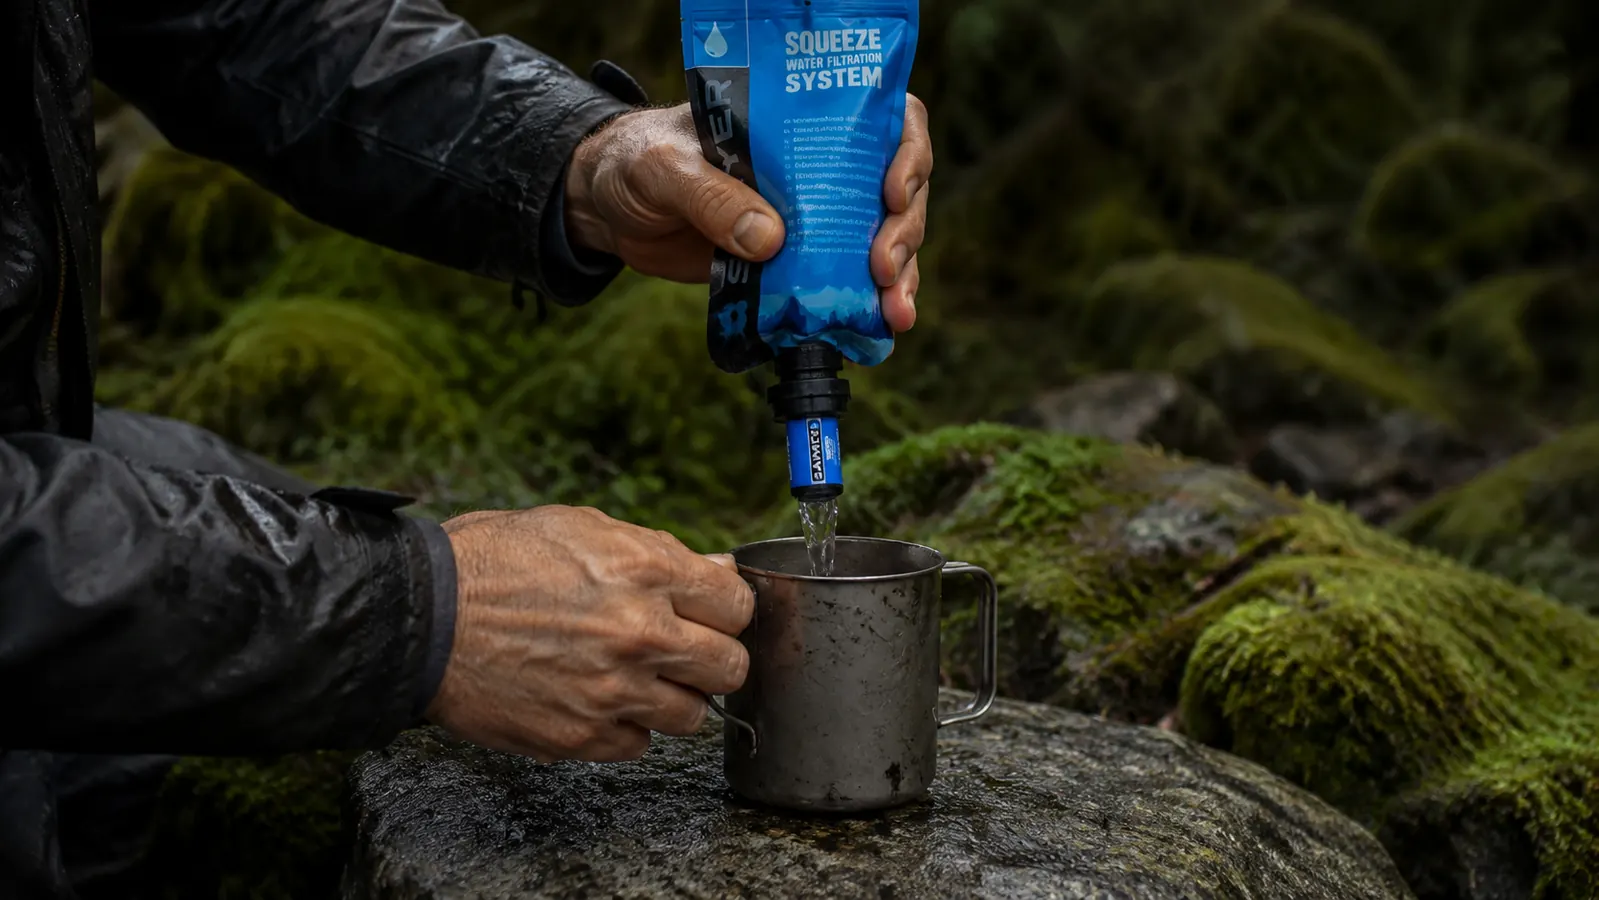
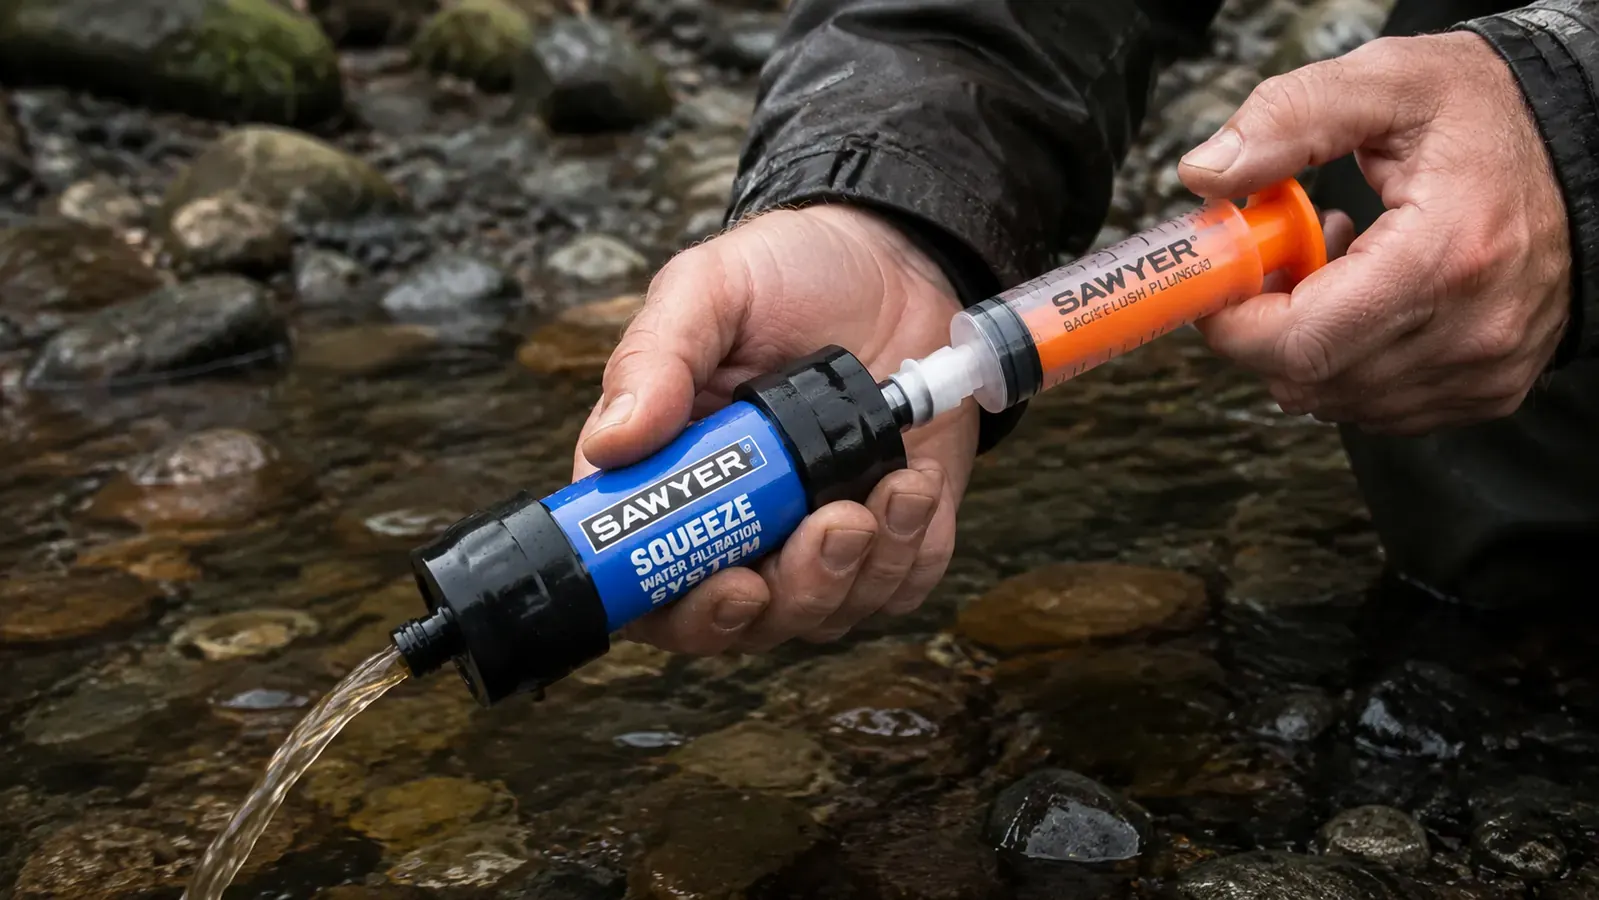
Step 3: Fill the Sawyer Pouch and Squeeze Into Your Clean Container
The Sawyer Squeeze comes with two 32-oz soft pouches. I carry one as my dirty-side collection pouch and keep a second one as a backup. Fill the dirty pouch at the source. Screw the filter onto the pouch opening. Hold the filter over your clean water bottle or camp mug and squeeze the pouch steadily. Don't death-grip it. A moderate consistent squeeze pushes water through the membrane without over-pressurizing the connection. A new or well-maintained Sawyer Squeeze moves about 100 to 120 ml per firm squeeze when it's in good shape. At that rate, filling a 32-oz container takes roughly 90 seconds.
Keep your dirty container and your clean container separate. I mark my dirty pouch with a strip of orange duct tape on the threading and my clean bottles are unmarked. This sounds obvious until you're filtering in the dark at 10 pm with headlamp batteries going dim, and suddenly the physical labeling matters a lot. When I hand my filter to someone else in camp for the first time, I walk them through which end of the filter is dirty-side-in (wide threads, larger diameter fitting) and which side outputs clean water (smaller fitting, often marked with a blue cap). The blue cap end goes into your clean bottle. Full stop.
The Sawyer Squeeze filters to 0.1 microns, which removes protozoa including Giardia and Cryptosporidium, plus bacteria. It does not filter viruses. In North America, viruses in backcountry water sources are rare enough that most experienced hikers and all major trail guides treat mechanical filtration as sufficient. If you're traveling internationally or in areas with known human contamination, add Aquatabs or Katadyn Micropur after filtering. That combination covers everything.
Step 4: Manage Flow Rate With Regular Backflushing
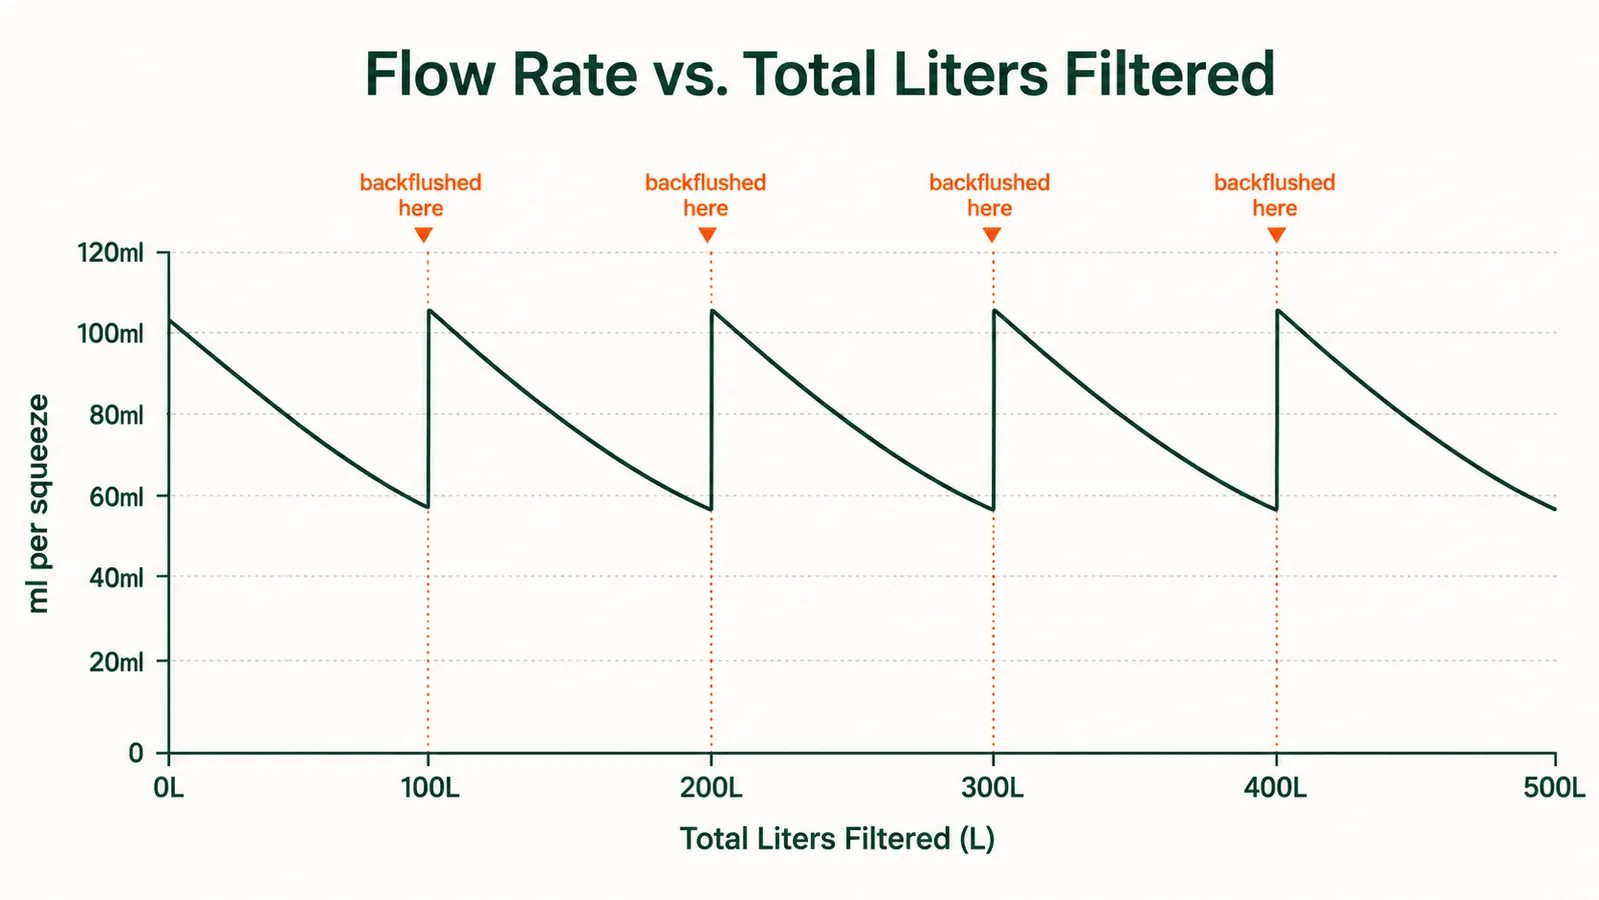
Flow rate is your real-time feedback on filter health. A new Sawyer Squeeze pushes water fast. By 50 liters of cumulative use without backflushing, you'll notice the pouch takes more effort and more squeezes to drain. By 100 liters without maintenance, some people give up on the filter entirely and think it's broken. It's not broken. It's just fouled with the minerals and particles it has captured, and the fix takes about 45 seconds.
Backflushing means running clean water backward through the filter to dislodge trapped material from the inside of the hollow fibers. The Sawyer Squeeze includes a small orange syringe for this. Fill the syringe with clean filtered water, attach it to the clean-output end of the filter (the small side), and push the plunger firmly. You'll see a small burst of discolored water come out the dirty-input end. Do that three to four times and check your flow rate. In most cases it comes right back. I backflush every 40 to 50 liters of use as a matter of habit rather than waiting until flow degrades. It takes less than a minute and keeps the filter performing like new.
One critical winter note: do not let a hollow-fiber filter freeze while wet. Ice crystals form inside the membrane and rupture the fibers. A frozen filter can look intact and still pass water, but it has microscopic holes that no longer block pathogens. If you're camping in below-freezing temperatures, sleep with your Sawyer in your sleeping bag. When the temperature drops to 28F and below in October in the Cascades, I put the filter in my chest pocket or bag interior every night without fail.
Step 5: Store and Transport the Filter Correctly Between Trips
Most filter failures happen not on the trail but at home in the gear closet. A wet hollow-fiber filter stored in a sealed bag or stuff sack will grow mold inside the fibers over weeks. When you take it back out for your next trip, your filter may look fine and even pass the flow test, but you're now filtering through a biologically contaminated membrane.
After every trip, I backflush the Sawyer twice with clean tap water. Then I leave it uncapped in a dry spot with good airflow for 24 to 48 hours before storing it. I store it in a mesh bag, never a sealed container. Once a season I do a diluted bleach flush: one teaspoon of unscented household bleach in a quart of water, run it through the filter from the clean side, let it sit for five minutes, then flush with a full syringe of clean water three times. This sanitizes the inside of the fibers and kills any mold that has started developing. Sawyer explicitly allows this. It does not void the warranty and it extends filter life noticeably.
Before any trip longer than a day, I run a quick flow test at home. Fill the dirty pouch with tap water, screw on the filter, squeeze through 8 oz into a measuring cup. If the flow feels close to what I'd expect from a fresh or recently backflushed filter, I'm good. If it's slow, I backflush twice before I leave. I do not wait to discover flow problems at the source on day one of a five-day trip.
What Else Helps
A few things that make the whole system work better in the field. First, carry a 1-liter clean bottle with a wide mouth as your primary post-filter container. The Sawyer Squeeze fits Smartwater bottles perfectly (the 28mm thread matches exactly). A lot of backpackers carry empty Smartwater bottles as their clean-side container because they're lightweight, durable for a plastic bottle, and BPA-free. I've been using the same two Smartwater bottles as Sawyer-compatible clean containers for two full seasons. They cost nothing and hold up to daily use.
Second, if you're filtering for a group of two or more people at camp, attach the Sawyer filter directly to the opening of a standard gallon ziplock bag. Fill the bag at the source, screw on the filter, hang the bag from a tree branch, and let gravity do the work. Gravity filtration is slower than squeezing (about a liter every three to five minutes versus a liter in 90 seconds) but it requires no effort. While it drips into your clean pot, you can set up camp or start a fire. It's a good setup for filtering tomorrow's water at the end of a long day when you're tired and don't want to stand there squeezing.
Third, carry a chemical backup. I keep six Aquatabs in a small zip bag that weighs essentially nothing. If my filter freezes, drops into a river, or gets stepped on, I still have a way to treat water. Chemical treatment is slower (30 minutes wait time with Aquatabs) and leaves a faint chlorine taste, but it keeps you from rationing water or making bad decisions out of desperation. The Sawyer Squeeze is extremely reliable. I'm not carrying the backup because I distrust it. I carry it because a filter without a backup plan is still a single point of failure.
If you're filtering for multiple people across a long trip, look at the full long-term review of the Sawyer Squeeze I wrote for this site. It covers specific flow rate numbers at 100L, 300L, and 500L of use, how the included pouches hold up versus aftermarket options, and whether the lifetime warranty is actually useful in practice. The review at sawyer-squeeze-review-long-term goes deeper on product durability and long-term cost math. If you're comparing it to the LifeStraw and trying to decide which to carry, the side-by-side I put together at sawyer-squeeze-vs-lifestraw-which-i-actually-pack lays out the real differences in field use.
The filter that fails you in the field is almost always one that was stored wet, skipped pre-settling in turbid water, or was never backflushed until it was too far gone. The Sawyer Squeeze itself almost never fails. The process around it is where most people go wrong.
Three years, thousands of liters, and I still reach for the same filter every time I leave the trailhead.
The Sawyer Squeeze SP131 is what I carry in the Cascades, the Olympics, and anywhere else I'm going to be drinking water from the ground. It's 3 ounces, it fits any standard bottle or pouch, and Sawyer backs it with a lifetime guarantee. If you're building a backcountry kit or refreshing your filtration setup, start here.
Amazon Check Today's Price on Amazon →